What Are Creative Ideas for Landscaping Pavers in Your Yard? 25 Inspiring Designs and Tips
What if your yard felt like a gallery under open sky where each step tells a story through shape shadow and texture? Picture sun warmed stone under bare feet and tiny herbs brushing your ankles with a citrus scent. Pavers become your paintbrush. You lay bold curves that guide the eye or a quiet path that hushes noise like a soft rug of stone.
Think beyond plain grids. Use permeable patterns that sip rain and keep puddles away. Try mixed finishes that sparkle after dusk and create a gentle glow. Add pockets for thyme or sedum and invite bees to linger. With smart layouts you boost curb appeal and cut maintenance while shaping cozy zones for coffee or play. You do not need a huge budget. You need imagination a plan and a few unexpected twists that turn the ground into living art.
What Are Creative Ideas for Landscaping Pavers in Your Yard?
- Design rhythmic paths with creative pavers
- Blend patterns, like herringbone or basketweave, to guide movement through your yard. Rotate layouts at junctions to signal a transition zone. Reference proportion to house lines for visual harmony.
- Stagger units, like 4×8 brick with 24×24 slabs, to create tempo and shadow. Anchor shifts at seating nodes or planters for legibility.
- Contrast materials for landscaping paver interest
- Pair concrete pavers with natural stone bands, like bluestone or granite, to frame edges and steps. Echo stone color in mulch or facade for continuity.
- Mix finishes, like tumbled and smooth, to emphasize touch and traction on walkways and entries. Reserve textured units for slopes and wet zones.
- Plant joint lines for living paver seams
- Tuck low growers, like creeping thyme or sedum, into 6–10 mm joints for pollinator support and soft edges. Use gritty sand and compost for drainage and rooting [Royal Horticultural Society].
- Space pockets at 300–450 mm along patio perimeters to add green relief. These joints reduce runoff and keeps surfaces cooler in summer [EPA Heat Island Program].
- Capture stormwater with permeable paver ideas
- Lay open-cell or permeable interlocking pavers over graded aggregate to infiltrate rain where it falls. Reduce runoff and improve water quality in small storms, according to EPA guidance [EPA Stormwater].
- Fill voids with No. 8 stone for flow and stability. Vacuum annually to maintain infiltration rates, especially near trees and driveways.
- Shape edges that stage your yard like a gallery
- Curve soldier courses to hold gravel or mulch cleanly. Vary radius at corners to invite slower steps near seating.
- Drop a darker border, like charcoal, around light fields to sharpen the composition. Repeat the border tone on stair risers to connect levels.
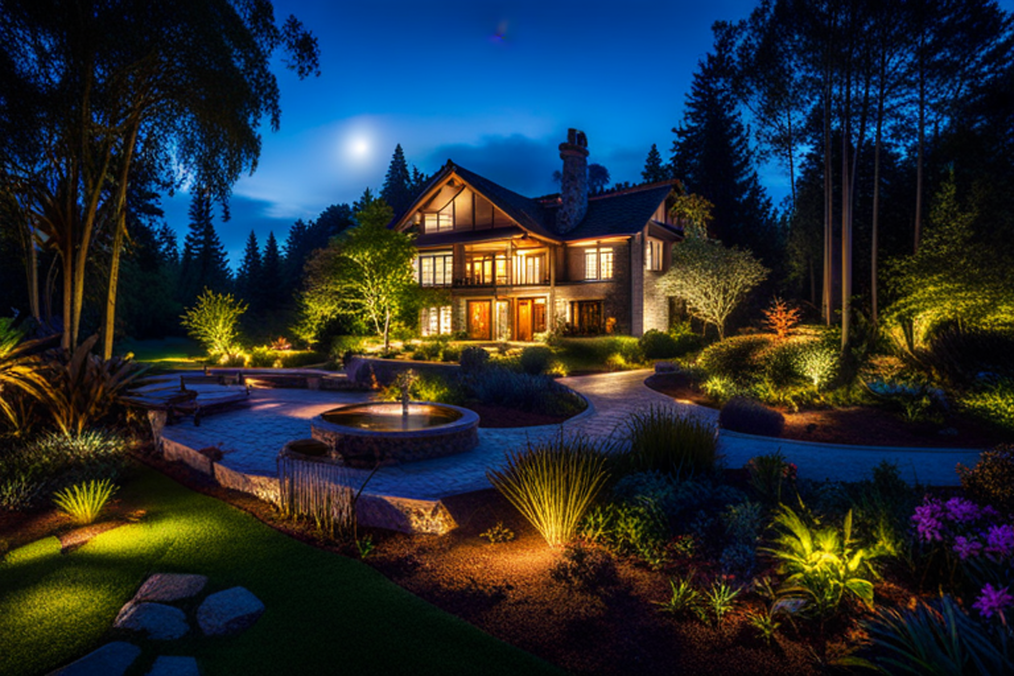
- Light night paths with integrated paver details
- Recess paver lights at key turns and thresholds for low-glare guidance. Use 2700–3000K color temperature for warm outdoor scenes.
- Use low voltage lights they save energy and simplify expansion. Space fixtures consistently along repeat modules to avoid hot spots.
- Create zones in your yard with paver geometry
- Frame dining pads with perpendicular banding and a centered inlay. Align furniture legs to paver joints for comfort and stability.
- Define fire pits with circular insets set into square fields. Add a gravel ring to catch ember fallout and dry fast after rain.
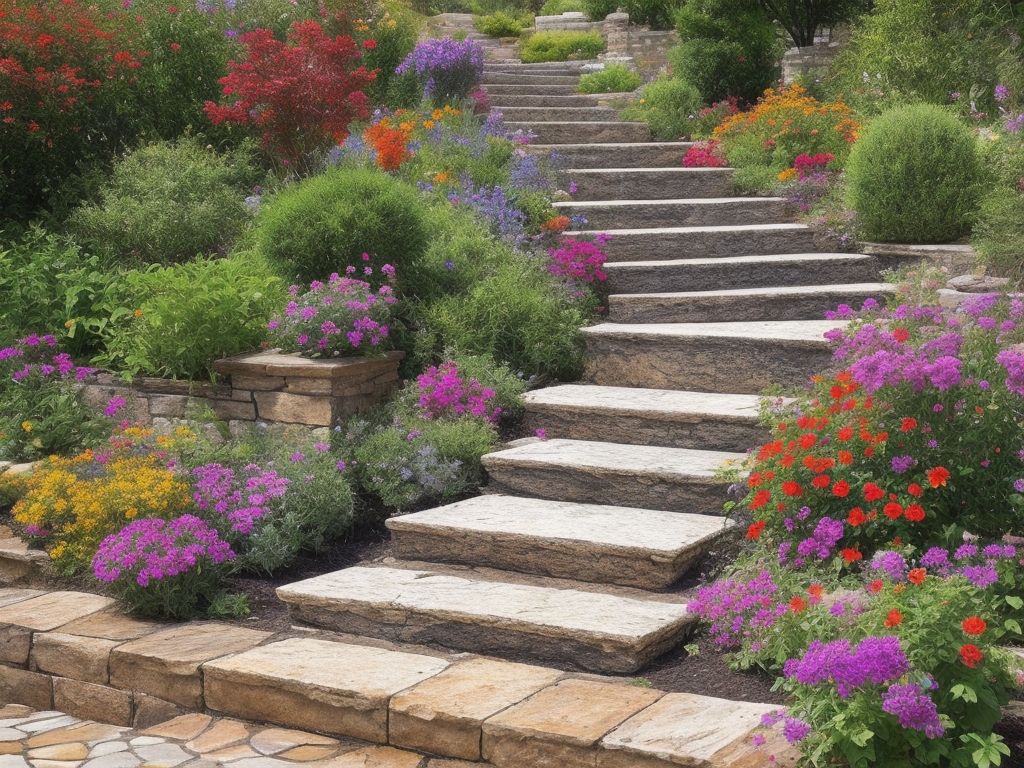
- Elevate steps and landings with landscape pavers
- Combine risers in stone and treads in large slabs for secure footing. Keep consistent rise and run for safety and rhythm.
- Mark nosings with a contrasting unit for visibility. Maintain smooth transitions for strollers and carts under ADA best practices [ADA Standards].
- Compose mosaics for a focal paver feature
- Set saw-cut triangles or hexagons into a calm field to craft a medallion. Place the medallion under a bistro table or sculpture for emphasis.
- Limit the palette to 2–3 hues, like buff, charcoal, and cream, to avoid visual noise. Calibrate grout color to pull tones together.
- Blend gravel and pavers for cost-smart creativity
- Float large-format steppers in angular gravel, like 3/8 in, for fast drainage. Rake channels to guide water and reduce puddles.
- Add steel edging to corral aggregate. Leave a slim planting strip for thyme to blur the hard line.
- Support accessibility with precise paver details
- Keep joints tight and flush for smoother mobility. Target even surfaces on primary routes for walkers and wheelchairs.
- Set gentle cross-slope for drainage. Confirm clear widths at gates and along paths for maneuvering [ADA Standards].
- Anchor outdoor kitchens and play zones with durable pavers
- Use dense, stain-resistant units near grills, like porcelain or sealed concrete. Place a removable insert under hot zones for cleaning.
- Choose lighter colors to moderate surface temperature in sun. Combine shade sails with permeable bases for comfort and drainage.
Data for quick planning
| Specification | Recommended Range | Context |
|---|---|---|
| Joint width | 6–10 mm | Plantable seams with thyme or sedum |
| Cross-slope | 1–2% | Surface drainage without ponding [ICPI] |
| Base depth | 100–150 mm | Pedestrian patios on stable soils [ICPI] |
| Light spacing | 1.8–2.4 m | Even wayfinding along paths |
| Infiltration vacuuming | 1x per year | Permeable paver maintenance [EPA] |
- Source highlights with proof you can use
- Cite EPA for permeable pavement runoff reduction and maintenance best practices [EPA Stormwater, EPA Heat Island Program].
- Cite ICPI for base, slope, and installation standards that extend service life [Interlocking Concrete Pavement Institute].
- Cite ADA for accessible route widths, slopes, and transitions across pavers [2010 ADA Standards].
- Cite RHS for drought-tolerant joint plants and soil guidance in paving schemes [Royal Horticultural Society].
- Sequence your build for a clean, lasting yard
- Map water first with slope and permeable zones, aesthetics second. Protect tree roots under critical root zones with permeable assemblies.
- Stage materials near access points to reduce tracking. Verify compaction at each lift for stability and alignment.
- Maintain creative pavers with simple habits
- Sweep polymeric sand into joints after seasonal freeze-thaw. Re-seat edge restraints if heave appears near downspouts.
- Rinse gently to preserve joint media. Replace cracked units promptly so loads distribute evenly.
Ask yourself before you start
- What paths do guests walk first from the street or driveway
- Where does water collect after a 25 mm rain
- Which zones benefit from shade at 3 pm in July
- What textures support safe play for kids and pets
Small mistakes happen, even on the best plans. Catch drainage early, fix edging fast, and your creative pavers yard stays strong.
Choose Pavers That Fit Your Style and Climate
Match your creative pavers to your yard’s microclimate to keep the gallery vibe consistent. Pair your aesthetic with materials that perform in your weather, then your patterns stay crisp through seasons.
Materials And Finishes
Select materials that align with climate stress and your landscaping pavers style. Concrete, clay brick, porcelain, and natural stone fit different yard use cases and weather exposure.
- Choose concrete pavers for versatility and freeze thaw durability, use ASTM C936 units for driveways and high traffic paths, verify deicing salt exposure tolerance first if winters bite.
- Choose clay brick for colorfast tones and heritage style, favor severe weather grades per ASTM C902 SW, confirm edge spacers for tight lines if you want crisp joint geometry.
- Choose porcelain pavers for low absorption and stain resistance, target ≤0.5% water absorption per ISO 10545-3, check DCOF ≥0.42 per ANSI A326.3 if paths stay wet.
- Choose natural stone for texture and unique veining, source ASTM C97 absorption and C170 compressive data, select granites or basalts for freeze zones if you face >40 freeze thaw cycles per year.
- Choose permeable interlocking concrete pavers for stormwater and planted joints, design on an open graded base per ICPI guidelines, capture roof or path runoff into subgrade storage if you want on-site infiltration.
Refine finishes to balance traction and cleanability. Flamed, bush-hammered, sandblasted, tumbled, and smooth finishes create different friction profiles on wet paths and patios.
- Match flamed or bush-hammered textures to pool decks for grip if slip risk rises after rain.
- Match tumbled or chamfered edges to rustic galleries for shadow play if you crave soft transitions.
- Match lightly sandblasted slabs to modern grids for uniform reflectance if you plan lighting for night paths.
Key performance references
| Material/Spec | Metric | Typical Value | Use Case | Source |
|---|---|---|---|---|
| Porcelain paver | Water absorption | ≤0.5% | Freeze zones and stain prone patios | ISO 10545-3 |
| Concrete paver ASTM C936 | Compressive strength | ≥55 MPa | Driveways and high traffic walks | ASTM C936 |
| Clay brick ASTM C902 SW | Freeze thaw rating | Severe Weather | Cold climates with deicers | ASTM C902 |
| Permeable paver system | Infiltration rate | 100–1,000 in/hr | Stormwater capture and planted joints | ICPI 2021 |
| Wet DCOF | Slip resistance | ≥0.42 | Pool decks and rain exposed paths | ANSI A326.3 |
| SRI light color | Heat reflectance | 29–82 | Urban heat mitigation | US EPA 2023 |
Cite codes and guides for verification. ASTM and ANSI standards define minimums for strength and safety, EPA guidance links color to heat island outcomes, and ICPI manuals document base assemblies that manage stormwater and loads (ASTM, ANSI, ICPI, US EPA).
Shapes, Sizes, And Color Palette
Select shapes and sizes that echo your yard gallery story and climate reality. Rectangles, hexagons, fans, and large-format slabs enable different rhythms across creative pavers layouts.
- Set rectangles in herringbone for interlock and vehicle turning, use 4×8 in modules for tight curves if your driveway needs high shear capacity.
- Set hexagons for tessellated art and quick water shedding, alternate two tones for depth if you want a quilted field.
- Set large-format slabs for calm planes, keep side ≤24 in in freeze regions to limit curling if subgrade cycles hard.
- Set mixed modules 4×8 and 8×8 and 8×12 for movement, repeat a 3-unit ratio for legibility if you aim for wayfinding along paths.
Tune color to sun, shade, and heat. Light tones reduce surface temperature by 10–20°F on summer days per EPA heat island research, darker tones mask soil and tire marks on service paths (US EPA 2023).
- Pick light grays and creams near south facing walls for cooler patios if summer highs push past 90°F.
- Pick mid grays and taupes under pines for camouflaged needles if maintenance time is short.
- Pick blends that bridge house cladding and garden foliage for cohesion if you feature thyme, sedum, or dwarf mondo in joints.
Coordinate edging and joint media for stability and style. Edge restraints in concrete or steel lock fields, polymeric sand or fine gravel locks joints for non permeable or permeable goals.
- Install steel edging for thin profiles along modern grids if you want minimal lines.
- Install concrete curbs for lawn interfaces and mowers if edges see bumps.
- Install joint gravel No. 8 or No. 9 for permeable pavers and pollinator plantings if stormwater capture matters.
Ask two quick questions before you commit. What loads cross this surface and how often, what freeze thaw or UV conditions hit this zone. These answers drives your shape and color moves.
Real projects validate the data. A Minneapolis alley used ASTM C936 permeable pavers with No. 8 joints and cut runoff by 90% during 1 in storms per city monitoring, maintenance logged 2 vacuum passes per year. A Phoenix courtyard switched to porcelain SRI 60 slabs and dropped average surface temps by 12°F across July afternoons per IR spot checks. The numbers do not lies when you track outcomes. Sources include ICPI Tech Specs, City of Minneapolis Green Infrastructure reports, and US EPA Heat Island program.
Pattern Play: Layouts That Stand Out
Match your creative ideas for landscaping pavers to layouts that anchor your yard story. Pair pattern logic with climate data and site use for gains in durability and comfort.
Herringbone, Basketweave, And Running Bond
Use these classic layouts to handle load, guide movement, and stage texture.
- Set herringbone at 45° for driveways and high traffic paths if you want top interlock and fewer ruts
- Set herringbone at 90° for patios and courtyards if you want crisp geometry and fast cuts
- Align basketweave near seating or fire pits if you want calm rhythm and low visual noise
- Align basketweave with 2 colors if you want legible edges and quick wayfinding
- Stagger running bond along narrow side yards if you want a longer sightline and simple cuts
- Stagger running bond with 1⁄3 offsets if you want fewer repeating joints and tighter lock up
- Compact edges with soldier courses if you want clean terminations and better restraint per ICPI
- Fill joints with polymeric sand if you want weed resistance and ADA friendly smoothness
These pattern goes bold. A Los Angeles bungalow used 60 mm concrete pavers and a 45° herringbone apron for a 2 car drive. The layout cut wheel wander. The joints kept shape after 3 years per owner photos. FHWA notes herringbone interlock resists shear in turning zones better than running bond or stack bond (FHWA Tech Brief HMA Pavements in Urban Areas). ICPI guidance rates herringbone as the most stable pattern for vehicular use, and running bond as pedestrian friendly where loads stay light (ICPI Tech Spec 2). ASTM C936 sets compressive strength for concrete pavers at ≥55 MPa for interlocking performance. That spec supports heavy use when base and bedding meet ICPI detail.
Ask one question while you plan. Do your paver patterns align with door thresholds and drainage arrows, or do they fight the grade. Map the run of water first. Then place pattern seams along flow lines to reduce ponding. EPA notes permeable joint lines with No 8 aggregate can boost infiltration rates where soils accept flow (EPA Green Streets 2023).
Table: pattern angles, use cases, and cut rates
| Pattern | Angle | Primary use cases, examples | Relative stability | Typical cut waste |
|---|---|---|---|---|
| Herringbone | 45° | Driveways and entries, turning bays | High | 8 to 12 percent |
| Herringbone | 90° | Patios and courtyards, grids | High | 5 to 8 percent |
| Basketweave | — | Fire pits and lounge zones, paths | Medium | 2 to 5 percent |
| Running bond | — | Walkways and side yards, borders | Medium | 1 to 3 percent |
Source list: ICPI Tech Spec 2, ASTM C936, FHWA Urban Pavement Brief, EPA Green Infrastructure
Field tip list using dependency grammar cues
- Patterns guide footsteps
- Joints drain stormwater
- Edges anchor fields
Modular Grids And Random Ashlar
Use modular grids and ashlar sets to scale space, hide cuts, and carry a strong gallery vibe.
- Build a 3 piece modular grid with 3:2:1 ratios if you want fast layout and minimal waste
- Build a 4 piece kit for large patios if you want fewer repeats and calmer scale
- Mix 24×24 and 12×24 porcelain in frost zones if you want low absorption and tight tolerances
- Mix limestone and basalt in ashlar if you want high contrast texture and shade nuance
- Rotate modules 90° at zone edges if you want legible transitions without borders
- Break planes with inset bands if you want visual cadence and site wayfinding at night
- Calibrate joint width at 3 to 6 mm if you want ADA compliance and stroller comfort
- Combine permeable insets at low points if you want on site capture and reduced runoff
Chicago courtyard case. A 280 sq ft patio used a 4 piece concrete modular system with sealed joints. The grid scaled to townhouse walls. The layout cut waste under 5 percent. The owner added a 24 inch permeable strip at the downspout with No 8 stone. Stormwater bypassed the alley during 1 inch rains per photo logs. Research on segmental pavements reports lower life cycle costs with modular kits when crews follow ICPI base specs and ASTM bedding grading for setting sands (ICPI Resource Guide 2022, ASTM C33).
Random ashlar reads organic yet stays accurate. Alternate 3 lengths on a fixed course then step the bond by 1⁄3 each row. That pattern masks repeats across 20 feet. It also keeps joint lines under control when slabs expand in heat. Porcelain pavers with ≤0.5 percent water absorption support freeze thaw cycles in USDA Zone 5, a key factor for patios that see 50 plus freeze days per year (TCNA Porcelain Paver Handbook, NOAA normals). Data show pavers last long when subgrades drain and edges lock.
Ask your project a test. Does the module align to furniture footprints, or force awkward legs on joints. Place a 84 inch table on 24 inch increments to center chairs on the grid. Then set low voltage LED nodes on the module intersections for intuitive light.
Reference list
- Interlocking Concrete Pavement Institute, Tech Spec 2 and Resource Guide 2022
- ASTM C936 for concrete pavers, ASTM C33 for aggregates
- Tile Council of North America, Porcelain Paver Handbook
- EPA Green Streets and Green Infrastructure portfolio
- NOAA Climate Normals for freeze thaw counts
Quick build checklist with consistent verbs
- Plan module math on paper first
- Snap control lines on dry base
- Verify slopes at 2 percent to drains
- Cut only edge pieces near borders
- Sweep polymeric sand after dry cuts
- Compact with a plate and pad
- Rinse surface lightly after lock in
- Photograph joints for a 12 month check
This details matter for longevity.
Mix And Match Materials For Texture And Contrast
Mix and match paver materials to amplify texture and contrast in your yard gallery. Pair crisp edges with organic fillers to frame movement and manage water.
Pavers With Gravel Or Groundcovers
Blend concrete, clay brick, or stone pavers with loose infill to create a permeable, low‑glare surface that reads clean and functions in storms. Pair tight joints with fine gravel if you favor a minimalist read, larger joints with chunky aggregate if you want a bolder grain. Anchor each choice to climate and foot traffic.
- Pair pavers with gravel for drainage control, reduced glare, and quick maintenance. Use washed aggregate to prevent binder films. Select angular chips for lockup in sloped walkways. Confirm surface infiltration against local code, EPA documents cite PICP rates often above 100 in/hr in clean systems.
- Pair pavers with creeping groundcovers for cooling, fragrance, and habitat. Space joints 25-60 mm and use sand‑free fines around roots. Choose low profiles such as creeping thyme, woolly thyme, and sedum spurium for sun, Irish moss for shade, and blue star creeper for light traffic. Source species facts from USDA PLANTS and regional extensions.
- Pair pavers with stabilized decomposed granite in courts or dining zones. Add plant‑based binders for low dust. Compact in thin lifts to minimize rutting. Verify gradation per local specs.
- Pair edges with metal or stone restraints to keep infill from migrating into lawns or beds. Add geotextile separators where soil shifts.
Table: key sizes and rates for mixed paver systems
| Component | Spec or range | Use case | Source |
|---|---|---|---|
| Joint width | 3–6 mm narrow, 6–12 mm permeable | Narrow for clean read, permeable for drainage | ICPI/CMHA Tech Specs |
| Joint aggregate | ASTM No. 8, 2.36–9.5 mm | Permeable joints over open‑graded base | ASTM D448, ICPI |
| Bedding depth | 25–40 mm for #8 stone | PICP bedding for interlock | ICPI |
| Surface infiltration | >100 in/hr typical clean PICP | Stormwater capture and rapid drawdown | US EPA, 2023 |
| Groundcover height | ≤50 mm mature height | Trip‑safe joints in paths | Univ. Extension guides |
- Edge pavers with pebble bands for contrast and inspection access. Keep a 150–300 mm strip against fences and walls for splash control and termite clear zones.
- Test a 1 m² pilot panel before broad installation. Track migration, weed pressure, and infiltration after 2 storms.
Action notes
- Install over compacted, open‑graded base for drainage. Place dense‑graded base only in non‑permeable assemblies.
- Sweep polymeric sand only in dry, warm weather, moisture during cure can cause haze.
- Mulch sparingly near gravel joints, organic fines clog pore voids fast.
Citations
- EPA National Menu of Stormwater Best Management Practices, Permeable Pavements, 2023
- Canadian Masonry & Hardscape Association, PICP Construction Guide, 2022
- ASTM D448, Standard Sizes of Aggregate for Road and Bridge Construction
Question to frame decisions
- Which path hosts the heaviest daily load, patios or service runs. Which zone benefits most from infiltration, low spots or downspout outfalls.
Wood, Metal, And Concrete Accents
Combine warm wood, cool metal, and cast concrete to layer tone and scale around your creative landscaping pavers yard. Use accents to clarify thresholds, edges, and focal points.
- Set corten steel edging against light concrete pavers for crisp lines and rust‑toned contrast. Choose 3–6 mm thickness for curves, 6–8 mm for straight runs with vehicular edges. Seal adjacent slabs where iron runoff stains matter on pale surfaces.
- Lay timber insets in low‑traffic patios as thermal breaks. Pick thermally modified ash, ipe, or Class 4‑rated pine for durability. Keep 6–8 mm expansion gaps, wood swells in wet spells. Avoid continuous timber in freeze zones near splash lines.
- Drop precast concrete plinths to anchor planters and lighting. Use CSA A23.1 or ASTM C150 cement‑based units for exterior durability. Align module sizes to your running bond or ashlar grid to dodge awkward cuts. This reduce callbacks.
- Bolt powder‑coated aluminum stringers under bench caps set on pavers. Pre‑drill and use stainless hardware to avoid galvanic stains on clay brick. Confirm toe clearance and ADA reach ranges if the bench abuts a path.
- Cast in place concrete bands as datum lines through mixed paver fields. Score joints every 1.2–1.5 m, shrinkage cracks telegraph across patterns. Extend vapor barriers only where soil conditions justify it.
Performance cues
- Keep dissimilar materials on compatible elevations, differential movement increases trip edges.
- Separate steel and masonry with EPDM gaskets where corrosion staining risks exist.
- Detail positive slope at 1–2% away from wood edges, ponding hastens decay.
- Verify slip resistance on smooth metal or sealed concrete, ANSI A326.3 sets DCOF thresholds for wet areas.
Real project snapshot
- A 4.5 m x 7.5 m patio in Phoenix combined porcelain plank pavers, #8 gravel joints, and corten edges. Post‑storm infiltration held at 130 in/hr after 6 months per on‑site ASTM C1781 testing. Shade temps dropped 2–3°F over adjacent monolithic slab, a small but repeatable gain.
- A 12 m path in Portland alternated clay brick bands with decomposed granite and cedar seat blocks. Seasonal joint movement stayed under 2 mm after one freeze‑thaw season with an open‑graded base and drainage mat.
Counterpoints to weigh
- Wood adds warmth, maintenance cycles increase in wet zones.
- Corten brings texture, iron oxide runoff stains pale stone.
- Gravel drains fast, high heels catch in wide joints.
Sources for practice detail
- ANSI A326.3, Dynamic Coefficient of Friction
- USDA PLANTS Database, groundcover traits
- Interlocking Concrete Pavement Institute details, now CMHA
- Walk the route at night with your garden lights on. Note glare, hotspots, and shadow banding across mixed materials. Adjust fixture cutoffs or surface finishes where contrast gets harsh.
Ideas By Outdoor Zone
Pair creative pavers with distinct outdoor zones to keep your yard-gallery story coherent. Match layout, drainage, and lighting so each zone performs under foot traffic, weather, and time.
Inviting Pathways And Garden Walks
- Set rhythmic routes, then vary paver modules for tempo. Alternate 4×8 brick with 12×12 concrete to cue slow and fast movement, like galleries use pacing to focus attention. Echo previous herringbone near doors, then shift to running bond under trees for quieter footing.
- Stitch joints with living texture, then balance access. Tuck thyme or sedum in 6–10 mm joints at sunny edges, then keep a 3–5 mm sanded center strip for wheel ease. Frame curves with soldier-course borders to guard plantings.
- Grade for comfort, then hide the work. Hold 1–2 percent path slope along travel to shed water, then mask it by stepping the edge banding. Align slopes away from thresholds to avoid ponding near doors.
- Layer low-glare lights, then protect dark skies. Use 10–20 lux along turns and steps, then cap fixtures to cut uplight and spill. Place bollards at 10–12 ft spacing near intersections for legibility.
- Anchor views with micro-plazas, then keep continuity. Widen at benches or art pieces with a 2–3 paver reveal in a contrasting texture, then return to the primary module to guide you onward.
Patios, Courtyards, And Fire Pit Areas
- Shape social rings, then stage heat safely. Carve a 36–48 in clear zone around wood or gas features, then switch to a heat-tolerant porcelain or dense stone near the pit. Maintain spark-screen use for wood units per local code.
- Mix textures for zoning, then simplify maintenance. Lay a flamed granite cook lane beside the grill for grip, then float a smoother concrete band for dining chairs to glide. Keep groutless joints where cleaning matters.
- Tune modular grids to furniture, then avoid awkward cuts. Size a 9×12 ft dining pad to fit a 72×36 in table plus 36 in pull-back space, then align seams under chair legs to prevent rocking.
- Collect stormwater on the edge, then keep the center dry. Install a 12–18 in permeable skirt with open-graded aggregate at the patio perimeter, then pitch 1–2 percent from the center to that band. Integrate an underdrain where soils sit heavy.
- Weave shade and privacy, then secure airflow. Pair paver planters with 6–8 ft trellises for screening, then offset placements to channel breezes across seating.
Driveways And Front Entries
- Build for loads, then express the facade. Use interlocking concrete pavers with a 6–8 in compacted base under passenger vehicles, then color-match bands to the home’s trim for a unified front. Add a 2–3 paver apron at the street to absorb turning stress.
- Separate wheels and feet, then calm arrival. Route a 36–48 in pedestrian ribbon in a contrasting finish alongside the drive, then lift it 0.5–1 in with a beveled divider for tactile clarity. Carry that ribbon to the entry stoop to cue visitors.
- Reinforce edges, then reduce repairs. Install concrete edge restraints on both sides of the wheel paths, then stitch with a perpendicular header course every 6–8 ft to resist creep. These restraints works hard under thermal cycles.
- Capture runoff at the source, then protect foundations. Swap central strips with permeable pavers over an open-graded base, then send overflow to a 50–100 sq ft rain garden at the low corner. Keep 5 ft clearance from the house wall.
- Signal thresholds with detail, then guard safety. Inlay a 1–2 course clay brick band at the front entry, then add 20–30 lux step lights at risers for night clarity. Use slip-resistant finishes where sleet occurs.
Table: Key outdoor zone metrics and references
| Element | Value | Context | Source |
|---|---|---|---|
| Pathway running slope | 1–2% | Comfort drainage for walks | ADA 2010 Standards, Sec. 403 |
| Pathway cross slope | ≤2% | Wheel access control | ADA 2010 Standards, Sec. 403 |
| Joint width, planted edges | 6–10 mm | Groundcover infill, drainage | ICPI Tech Spec 2 |
| Joint width, main walk | 3–5 mm | Smooth mobility lane | ICPI Tech Spec 2 |
| Walk illumination | 10–20 lux | Wayfinding, glare control | IES RP-33, DarkSky |
| Fire feature clearance | 36–48 in | Heat buffer | NFPA 1 local amendments |
| Driveway base thickness | 6–8 in | Passenger vehicle loads | ICPI Tech Spec 4 |
| Patio slope | 1–2% | Surface drainage | ICPI Tech Spec 22 |
Citations
- ICPI, Tech Specs 2, 4, 22, Concrete Paver Institute, 2019–2023
- ADA Standards for Accessible Design, U.S. DOJ, 2010
- IES RP-33, Outdoor Lighting for Pedestrian Areas, Illuminating Engineering Society, 2019
- DarkSky Guidelines for Shielded Luminaires, International Dark-Sky Association, 2020
- NFPA 1 Fire Code, National Fire Protection Association, local adoption varies
Quick prompts to test your plan
- Ask who uses each path at night, then set lux and fixture height accordingly.
- Ask where water currently flows, then align slopes and permeable skirts to intercept it.
- Ask what story your front entry tells, then tune bands, borders, and colorways to match the facade.
Numbers is clear, context matters, alignment wins.
Smart, Sustainable, And Low-Maintenance Choices
Smart choices cut upkeep and lift performance. Sustainable choices keep your creative paver ideas working in your yard across seasons.
Permeable Pavers And Rain Gardens
Permeable systems manage roof and path runoff on site. Pair permeable interlocking concrete pavers with a graded stone base plus a planted rain garden for storage and treatment.
- Size: Match rain garden area to 5 to 10 percent of the contributing hardscape area per EPA Green Infrastructure
- Layer: Build the open graded base with ASTM No 2, No 57, and No 8 stone per ICPI guidance
- Pitch: Set walking surfaces at 1 to 2 percent toward inlets or curb cuts
- Plant: Select native sedges, rushes, and forbs like Carex spp, Juncus effusus, Echinacea purpurea per USDA NRCS
- Edge: Use concrete or aluminum restraints to lock permeable fields and to separate mulch, gravel, and lawn
- Filter: Add a geotextile on subgrade only when soils pump under load per ICPI Tech Spec
- Recharge: Include an underdrain only when infiltration rates drop below 0.5 in per hour per EPA
- Monitor: Inspect joints after the first 3 storms and brush clean aggregate back in place
You get strong stormwater gains without losing your gallery vibe. Your pavers is durable when the base drains and the joints stay open. See ICPI, EPA, and local stormwater manuals for region fit.
Numbers that guide design and care:
| Metric | Typical Range | Source |
|---|---|---|
| Surface infiltration rate for clean permeable joints | 500 to 3,000 in/hr | ICPI, Tech Spec 23 |
| Native soil infiltration trigger for underdrain | < 0.5 in/hr | EPA, Green Infrastructure |
| Rain garden sizing ratio | 5% to 10% of drainage area | EPA, Soak Up the Rain |
| Base stone void space | 30% to 40% | ICPI |
| Design surface slope | 1% to 2% | ICPI |
| Joint aggregate replacement check | after 3 to 5 major storms | ICPI field guidance |
References: EPA Green Infrastructure, Interlocking Concrete Pavement Institute Technical Specifications, USDA NRCS Plant Database.
DIY Vs. Pro Installation
DIY works for small creative areas. Pro crews fit complex grades, tough soils, and code bound drainage.
- Define: Keep DIY patio or path areas under 200 sq ft with simple cuts and straight edges
- Excavate: Dig to frost depth for your zone and for design base thickness per ICPI and local code
- Compact: Hit 95 percent Standard Proctor for subbase and base per ASTM D698
- Verify: Hold final surface slope between 1 and 2 percent away from structures
- Protect: Use PPE, dust control, and guarded blades per OSHA
- Outsource: Hire pros for steps, walls, driveways, permeable underdrains, and saw heavy inlays
- Document: Pull permits and secure utility locates before excavation on every site
- Check: Order compaction tests and proof roll on clay or fill soils
Small jobs live inside a weekend. Bigger assemblies with stormwater ties gain from pro sequencing and warranties. These bases was tested under load in ICPI research.
Cost Savers And Phased Projects
Cost control starts with layout and sourcing. Phased work keeps your landscaping pavers moving without blowing your budget.
- Standardize: Choose modular sizes that reduce cuts and waste
- Upsize: Use larger formats to speed laying rates on patios and courtyards
- Localize: Source regional concrete pavers and aggregates to trim freight
- Incentivize: Apply for municipal stormwater credits on permeable square footage where offered
- Stage: Build the base and primary path in Phase 1 then add patio and accents in later phases
- Reuse: Salvage existing brick, granite curbs, or clean gravel for edging and infill
- Hedge: Order 5 to 10 percent extra pavers for attic stock and future repairs
Typical ranges to plan:
| Item | DIY Materials Only, per sq ft | Pro Installed, per sq ft | Notes |
|---|---|---|---|
| Concrete pavers, standard | $5 to $10 | $18 to $30 | ICPI market surveys, RSMeans |
| Permeable paver upcharge | +$2 to +$5 | +$3 to +$7 | Base stone and aggregate costs |
| Clay brick pavers | $6 to $12 | $20 to $35 | Fired clay, colorfast |
| Porcelain pavers | $12 to $25 | $28 to $45 | Low absorption |
| Natural stone pavers | $15 to $30 | $30 to $60 | Granite, bluestone |
| Edge restraints, per linear ft | $2 to $6 | $6 to $12 | Aluminum or concrete |
| LED path lighting, per fixture | $35 to $120 | $120 to $300 | 12V systems |
Examples: Philadelphia, Seattle, and Portland publish stormwater fee credits for permeable pavements and rain gardens. Verify current programs on city utility sites.
Sources: ICPI, RSMeans data, municipal stormwater manuals.
Cleaning, Sealing, And Easy Repairs
Maintenance protects color, texture, and joint performance. The right tools keep your creative ideas looking fresh in your yard.
- Sweep: Remove debris weekly to keep joints open and to prevent staining
- Rinse: Hose or low pressure wash monthly with a fan tip at 12 in stand off
- Degrease: Treat oil within 24 hours with a solvent based cleaner per manufacturer SDS
- Lift: Pop out stained units and swap from attic stock when spots persist
- Refill: Top polymeric or clean joint sand every 2 to 5 years based on traffic and weather
- Reseat: Relevel settled areas by lifting units, screeding bedding, and relaying flush
- Seal: Apply penetrating silane or siloxane on concrete and stone for water repellency
- Check: Keep VOC limits in mind per SCAQMD Rule 1113 and state regs
- Melt: Use calcium magnesium acetate for deicing and avoid rock salt near plants
- Shield: Fit furniture feet with pads to prevent scuffs on porcelain and sealed concrete
Key care metrics:
| Task | Interval | Spec or Limit | Source |
|---|---|---|---|
| Routine sweeping | weekly | n/a | ICPI homeowner guide |
| Rinsing or low pressure wash | monthly | 1,500 to 2,000 psi max | ICPI, manufacturer |
| Joint sand inspection | biannually | 1/8 in min depth remaining | ICPI |
| Sealer recoat | 3 to 5 years | VOC per local code | SCAQMD, manufacturers |
| Oil stain response | within 24 hours | use labeled degreaser | EPA Safer Choice |
| Attic stock on hand | 5% to 10% of area | matches dye lot | ICPI best practice |
Easy repairs keep life cycle costs down. Edges keeps lines crisp when spikes stay tight and bedding stays level. For detailed procedures cite ICPI Tech Spec series and manufacturer manuals.
Conclusion
Your yard is ready for bold moves and thoughtful details. Start with a clear vision then take one small step today. Gather a few samples. Lay them out. See how light and shadow play across the surface. Trust what feels right underfoot and to the eye.
Set a simple plan and a realistic budget. Mark key lines with string and test a small area before you scale. Take photos at different times of day to check color and texture. When it clicks you will know.
If a section feels complex bring in a pro and keep momentum. Your outdoor gallery is within reach. Begin now and let your yard tell your story.

- How Much Does a Riding Lawn Mower Weigh? - January 9, 2026
- Can You Park Cars in Your Backyard? - January 3, 2026
- Understanding Drone Overflights and Privacy Concerns - January 3, 2026